Whether you want to create a custom plugin for your own website or publish the plugin publicly we will help you learn where and how to begin. We will walk you through all the steps involved in custom WordPress plugin development so that you can start developing and publishing your own custom plugins.
We will begin by covering a general introduction to WordPress Plugin Development and then describe in detail the various steps to make a WordPress plugin.
What Skills You Need to Develop a WordPress Plugin
You don’t have to be an expert developer to get started, but you will need some coding knowledge to be able to develop a working plugin and then publish it online for others to download.
WordPress plugins are developed in PHP so a basic knowledge of PHP is a must-have requirement and is the most essential aspect of plugin development.
You will also need some basic understanding of HTML and CSS so that you can control the plugin’s output. If you want to work with the new Gutenberg block editor in WordPress 5.0 you will also need knowledge in JavaScript.
Basics Development
If you want to customize the WordPress site, editing the core WordPress file isn’t going to cut it. That’s because the WordPress files are overwritten every time you update the WordPress site.
However, to get things around you can add and modify the functionalities by using some PHP functions.
The four main elements of WordPress plugin development are:
- Hooks
- Blocks
- Shortcodes
- Widgets
Hooks
Hooks are a feature in WordPress that enables developers to interact with various sections of WordPress without needing to modify the code files. It lets you execute a core function at a certain point in time and a certain part of the website.
WordPress hooks come in two primary formats – action hooks and filter hooks.
Action hook: Action hooks enables you to add new processes to WordPress i.e. it lets you run a specific PHP function at a specific point in time on the WordPress website.
For example you can run an action hook so that every time you publish a new blog post it automatically shares a tweet for the blog.

Filter hooks: Filter hook enables you to modify a process to change its data without having to edit the source. It enables you to retrieve and modify the data before saving it to the database. It basically lets you modify the values returned with having to change the core WordPress value.
For example this code will prepend a text in all post titles:

Blocks
Since the release of block editor Gutenberg in WordPress 5.0 blocks have become an essential part of WordPress plugin development.
The older WordPress editor was a TinyMCE editor which focused only on text editing. In comparison the WordPress 5.0 contains blocks that enable you to alter the page layout and insert various visual and interactive elements.
However to utilize the blocks in the plugin, you will need to have a good understanding of JavaScript, Node.js, React and Redux.
Shortcodes
Shortcodes are an older way but an effective way of interacting with the plugin. In the past nearly all WordPress plugins relied on shortcodes which enabled users to insert plugin content into the post. However, today developers are using blocks more than codes to achieve the same result.
That being said, many plugins today employ both blocks and shortcodes.
For example:

When a user adds this shortcode to the post editor, it will display the current year.
Widgets
WordPress has a WP widget class in PHP which can display the plugin’s content to the end-use. Widget is an older concept in WordPress because with the advent of WordPress 5.8 the older widget system has been replaced with block.
6 Components
A WordPress plugin will have a few components; some of them are a must-have irrespective of the plugin and then there are some which will depend on the complexity of the plugin development.
These are the bare minimum components a typical plugin will have:
- Main plugin folder – A folder to organize all the files of you plugin
- Main plugin file in ‘php’ with header – This php file contains all the plugin information along with all the plugin’s code
- Subfolders – you can use subfolders to organize all your plugin files and assets.
- Scripts – Enqueue JavaScript when needed
- Stylesheets – Enqueue CSS when needed
- Readme.txt – It is an important component of plugin development when you want to submit your plugin to WordPress.org.
5 Steps to Build a WordPress Plugin
Let’s dive deep into understanding the steps to build your WordPress plugin:
- Prepare the requirements for the plugin development
- Create the plugin folder and structure
- Add plugin file header
- Write the code
- Package the plugin and deploy to WordPress
Prepare the requirements for the plugin development
Before you start working on the actual code of the plugin you need to prepare the actual code and files of the plugin. First you need to define and prepare a layout of the requirements of the plugin detailing the features, appearance and functionalities it will have.
Here are a few questions that you should be able to answer to prepare the requirements of the plugin:
- What are the plugin features?
- How will users interact with these features?
- What input the plugin needs to function as intended?
- What will the front-end interface look like?
- Will the plugin integrate with other services?
- What are the potential compatibility issues that plugin might have?
Answers to these questions will determine how you approach coding your plugin.
Create the plugin folder and structure
By default, WordPress stores all plugins inside the ../wp-content/plugins folder. All the plugin files will be stored in a folder in that directory for example ../wp-content/plugins/hello-world/.
The complexity of the folder depends on the complexity of the plugin. A simple plugin will have a single php file with all the necessary code to run the plugin.
For example ../wp-content/plugins/hello-world/plugin-file.php.
And templates in ../wp-content/plugins/hello-world/templates
For other complex projects you can also consider the model-view-controller design pattern. This design pattern can help you speed up the development process.
Add Plugin File Header
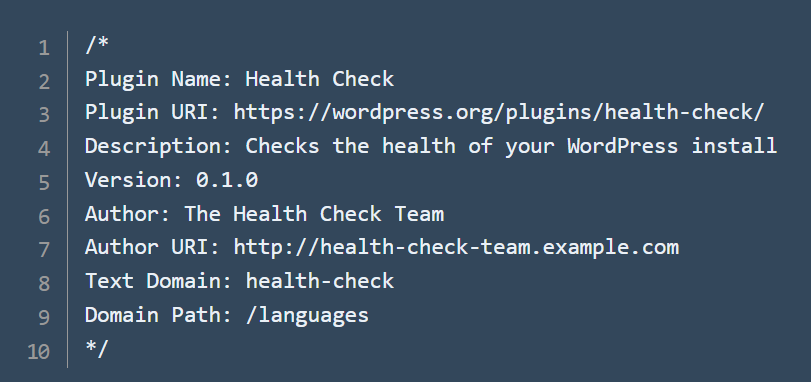
While creating the main PHP file for your plugin you will need to add a header file to help WordPress understand your plugin.
This plugin file header is a PHP comment block which includes details about the plugin such as plugin name, version number, licensee, author etc. WordPress will use this information to show details about the plugin in the plugin area of the dashboard.
Example of a plugin header file

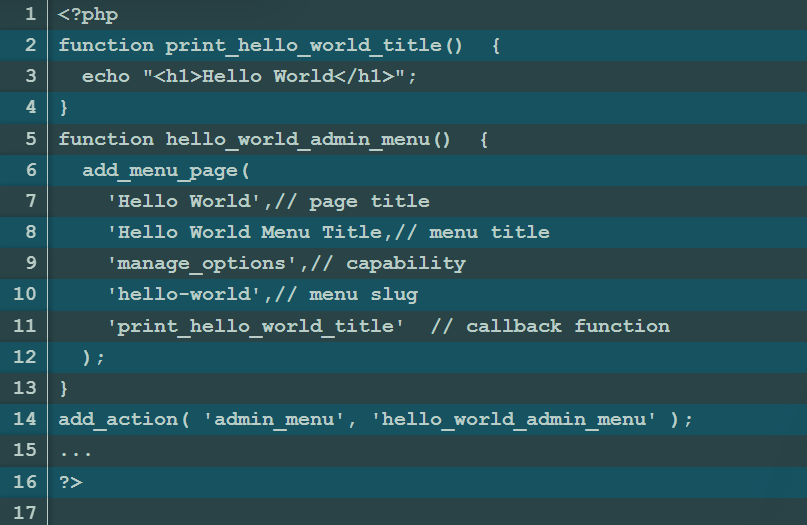
Write the code to Add Functionality
This is the phase where most of the plugin development happens. This step is the most time-consuming part than all the previous steps.
You can refer to the WordPress.org plugin handbook for more details on WordPress functionality.
Example of plugin development

Deploy Plugin to WordPress
Once you have finished developing your plugin you are now ready to package and deploy the plugin to WordPress.
The easiest way to achieve this is by packaging your main plugin folder as a ZIP file. Users can install the plugin directly from the WordPress dashboard by going to Plugins → Add New and then upload the ZIP file.
After installation the plugin will show up in the regular plugin list. You can then post the information to appear in the plugins list by using the plugin file header file.
Plugin Development Best Practices
- You can get into WordPress plugin development faster by using the right tools such as: text editor, an FTP client to quickly shift files between your local system and server, and a development server to test your plugin.
- Creating a plugin requires a ton of time and effort. You can simplify it by using a boilerplate which can save a ton of time by employing reusable code.
- Adhere to WordPress coding standards and use the built-in functions of WordPress to avoid rework.
- Use MVC structure to ensure that other developers can add to the existing code without hassle.
- Update your plugin to ensure it’s compliant with the latest version of PHP and WordPress.
Create Personalised discount strategies for your target audience and unlock exclusive savings with a custom WooCommerce discount plugin!
Conclusion:
Developing WordPress plugins may sound empowering, but it comes with a lot of challenges. It involves complicated coding and dealing with issues like compatibility, which can be tricky.
Creating a plugin requires time, skill, and paying close attention to details. If a plugin is not made well, it can seriously affect how a website works and how satisfied users are.
Our WooCommerce Plugins provide a better option. Instead of dealing with the difficulties of making your own plugin, you can easily improve your online store with our reliable and professionally made solutions. Don’t risk using a poorly made plugin – trust our proven plugins to make your store work better, give users a great experience, and make your online business successful.
In the competitive world of online shopping, it’s important to make smart choices. Choose our WooCommerce Plugins for a strong and efficient online store without wasting your precious time.


 Article
 Infographic
 Plugin Development
 WordPress Development
 WooCommerce Development


Jay